Animation Wizard Step 3: Set the image to center of the frame.
Animation Wizard Step 4: Select to repeat animation indefinitely.
Animation Wizard Step 5: Browse to the required images for the animation.
Animation Wizard Step 6: Set the selected images in animation order.
Animation Wizard Step 7: Select Finish to create animation.
Animation Wizard replace colour dialogue box.
Created using Xara X1 Paint Shop Pro 7 and Animation Shop 3 .
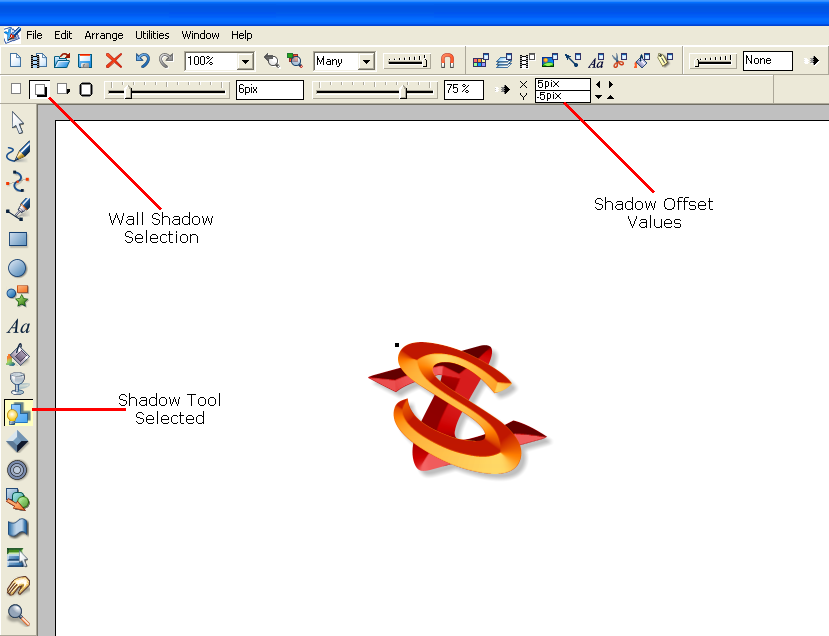
Step 1:
Using Xara X1 open the image with the merged S and Z, (found in the SZ Button Tutorial section) and remove the shadow to leave a plain S and Z. This is accomplished by selecting the shadow tool and then clicking on the "No Shadow" icon on the shadow types toolbar icon. The idea is to create 36 images at 10° intervals with the shadow always to the right and down which requires the shadow to be removed each time before rotating the image!
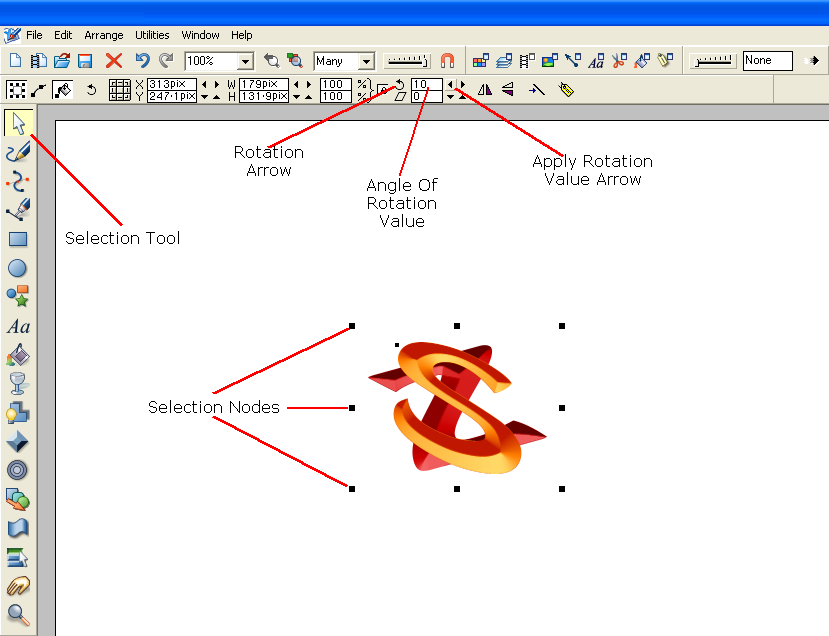
Step 2:
Using the Arrow Tool select the non shadowed S and Z merged image and rotate it by 10°using the following method:-
Click on the image so that the Selection Nodes appear, in the angle of rotation field box next to the rotation arrow symbol type a value of 10, click on the apply rotation value arrow, the image should now rotate anticlockwise by 10°.
Step 3:
We now need to re-apply the shadow to the rotated image by selecting the Shadow Tool and choosing the "Wall Shadow" image option from the shadow types toolbar icons. Use a shadow offset of 5 pixels right, 5 pixels down as before and save the image with a meaningful name (sz_rotate_10.xar) for example, finally export the image as a PNG, JPEG or GIF image and save it with the same name.
Note:
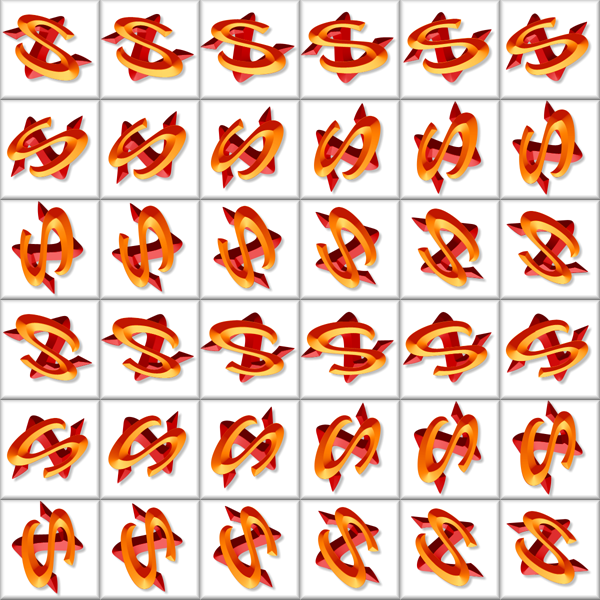
Enough images need to be created to give a smooth transition between each image so as to give a spinning effect. I chose to use 36 images so 10° could be used for each rotation but more or less images can be used, just remember the angle of rotation for each image will change according to the number of images chosen and the following formula should be applied:-
"360° divided by the number of images required = the angle of rotation for each image"
Step 4:
Creating multiple images with a rotation of 10° per image can be done in one of two ways. Either way requires the shadow to be removed as described in Step 1. You can then apply a rotation of 10° to each preceding rotation, re-apply the shadow and save the image repeating this 36 times.
The other way is to incrementally add 10°, 20°, 30°... etc. to the original non-shadowed image until 360° is reached again removing and re-applying the shadow where required, saving at each stage.
This completes the stages using Xara X1.
Paint Shop Pro 7 (Anniversary Edition) .
Note:
The following procedures are simple ones but may take some time as they need to be applied to each image in turn, Paint Shop Pro 8 has a new "scripting" feature that could be run to produce the same effect on each image as a batch but unfortunately it is a feature lacking in Paint Shop Pro 7 (Anniversary Edition) which is the version I am using for these tutorials.
Step 5:
Open all 36 images in Paint Shop Pro 7, (the PNG, JPEG or GIF images whatever format you decided upon earlier) and resize the canvas for each one in turn.
Choose a size that is square and at least 2 pixels bigger than your largest image making sure that the background colour is set to white or to the same as the main background colour in your image, for these examples I used 200 pixels by 200 pixels as my largest image was 154 pixels by 198 pixels.
Step 6 (Optional):
The final part using Paint Shop Pro 7 (Anniversary Edition) is to re-size the images to something more reasonable in size. This stage is not imperative as you can re-size the Animation later on in Animation Shop 3 and can therefore be omitted!
Open each image again and use the Re-size Tool to change the size of each image, I used 75 pixels by 75 pixels. If your images are JPEG format it is best to include this step into step 5 before saving due to the way JPEG's compress and pixelate after each save.
This completes the section using Paint Shop Pro (Anniversary Edition).
Animation Shop 3 .
Step 7:
Open Animation Shop 3.
The easiest way to create the spinning logo from this point is to run the Animation Wizard, this will cause a series of options dialogue boxes to open that offer different options to determine how the Animation ends up. There are 7 option boxes of concern that may require option changes.
Step 8:
Each image links to a screen shot showing the relevant stages in the Animation Wizard... .
The relevant bits are:- 1: Define size as 200px by 200px. 2: Transparent canvas. 3: Centred in the frame with the canvas colour. 4: Play indefinitely, each frame 15/100ths of a second apart. 5: Add images 1 to 36. 6: Set image order. 7: Finish the wizard.
Step 9:
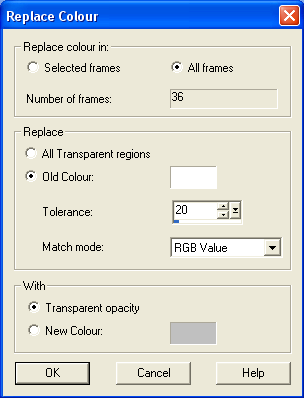
The Wizard will now create the Animation using the chosen settings, (to make the Animation transparent you will need to select the transparency colour).
Select "Animation" from the drop down menu and select the Colour Replacer Tool. Select all frames then use the colour dropper to select the white region in the animation for the "Replace Old Colour" section. In the "Replace With" section choose transparent opacity, click OK and the jobs done.
Finally:
When the Animation is saved Animation Shop will run an optimiser and save the Animation as an Animation GIF. Unfortunately there is no option not to run the optimiser so the image quality suffers slightly. There is a custom option within the optimiser but it is not much use unless you want to reduce the image even further.
Hosted on
All trademarks and copyrighted material are property of their respective owners
 Paint Shop Pro 7
  and Animation Shop 3
  .
.