Sometimes one flashgun simply does not provide enough light to illuminate the subject sufficiently therefore multiple flashguns need to be employed, plus the more flashguns that are used the faster the camera speed can operate increasing depth of field.
Another good reason for using multiple flashguns is to help to minimise or cancel out shadows by placing them in a strategic fashion around the subject, this could include above and below subject flashgun placement.
However as we are now using more than one flashgun the aperture needs to be re-calculated to allow for the extra light falling on the subject or else it will be over exposed or "washed out".
To calculate the correct "ƒ" number for your camera to match the multiple flashgun layout three criteria need to be known. (1) The guide number for the flashguns, (usually found in the specifications document for the flashguns or marked on the flashgun itself). (2) The distance to the subject from the flashguns. (3) The ISO speed being used.
The Calculation...
To calculate the "ƒ" number for each flashgun, divide the Guide Number by the Subject Distance.
For example:
A flashgun with the guide number of 20, (measured in meters at ISO 100) with a subject at a distance of 4 meters, would give an answer of ƒ5, (Guide Number 20 ÷ 4 meters = ƒ5).
Simple maths but you could of use my aperture calculator instead...
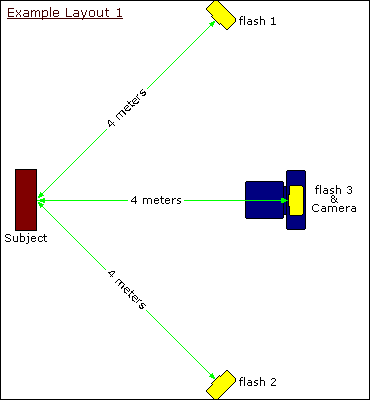
Example Layout 1:
This
shows three flashguns placed around a subject each at a distance of 4 meters, this was to make the calculation simpler in this example but the flashguns could be at different distances as in Example Layout 2.
Take it that each flashgun has the same guide number we have already worked out that 1 flashgun would require the camera to be set to ƒ5, as the distances for each flashgun to subject is equal the formula becomes much easier using the inverse square rule.
5² + 5² + 5² =
25 + 25 + 25 =
75 for the resultant squares. √ 75 = 8.66 the resultant square root.
So for Example
Layout 1: the desired aperture setting is ƒ8.66 or the nearest available for the camera lens being used which would probably be ƒ8.
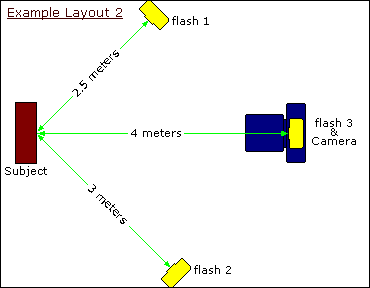
Example Layout 2:
This
shows the same three flashguns only this time the distance to the subject is varied. This means each flashgun needs to have the "ƒ" number calculated as they will be different.
For flash 1: Guide Number 20 ÷ 2.5 meters = ƒ8.00.
For flash 2: Guide Number 20 ÷ 3.0 meters = ƒ6.67.
For flash 3: Guide Number 20 ÷ 4.0 meters = ƒ5.00.
So using the inverse square rule the following applies...
8² + 6.67² + 5² =
64 + 44.44 + 25 =
133.44 for the resultant squares.
√133.44 = 11.55 the resultant square root.
So for Example
Layout 2, the desired aperture setting is ƒ11.55 or the nearest available for the camera lens being used which would probably be ƒ11.
Light Path Distance:
It should also be noted that the distance used in the formulas is the distance the light has to travel from the flashgun to the subject, not the distance the camera is away from the subject.
If "Bounce" flash is used, (for example refracting off of the ceiling) the distance to the subject is greatly increased due to the nature of the path the light has to travel.
Three flash gun layout, subject 4 meters away.
Three flash gun layout, variable subject distance.
Hosted on
All trademarks and copyrighted material are property of their respective owners